
Let’s say you’ve just created a Google Form and not only want to share it with others, so they can add or edit questions but also with people so they can submit their responses. Both these things are possible provided you know how to share a Google Form.
This tutorial will first show you how to share a Google Form so that you can add your co-workers as collaborators. Then, we’ll walk you through how to share your Google form with people so they can submit their responses. Let’s start with how to allow access to ‘collaborators.’
How to allow access to a Google Form for someone to help with it
You can give other people access to your form so they can see it and edit it by adding Collaborators to it.
Google forms make it easy to add collaborators, and you can do it in a few simple steps. Here they are:
Step 1: Go to the Google Form
Navigate to Google Forms through your web browser, and if you don’t get signed in automatically, sign in to your Google account.

If like most people, Google is your home page, another easy way to do this is by clicking the Google apps button (nine dots) in the top right corner of your browser and then scrolling down and clicking on ‘Forms.’ Doing this will get you to your Google Forms.

If you like working from your Google Drive, Google Forms is accessible from there as well. Navigate to your Google Drive. Now click on the ‘New’ button. This will open up a drop-down menu. Find ‘Google forms’ in it, click it, and then select whether you want to open a new or a pre-existing form. Google Forms will open up in a new window.

Step 2: Click on ‘Add collaborators’ under ‘More options’
Once you’re in your Google Forms, find and open the form you want to share. If you don’t have a form yet and want to learn how to create one, then you can find out how to create a form in this tutorial.

Now that you’ve opened the form to which you want to add collaborators, find and click the more options button (three dots) in the top right corner. When you do this, it will open a drop-down menu. Find ‘Add collaborators’ and select it.
Another way to get here is to click the ‘Send’ button on the top right. This will open a pop-up window like this:

In this window, if you click the ‘Add editor’ button at the bottom, you will get to the ‘Add editors’ window again.
Step 3: Share a Google Form by adding collaborators

Now that you have reached the ‘Add editors’ window, simply add the emails of the people you want to give access to. Remember, editors can view the responses on your form and edit the questions.

When you add their email, you will see an option to add a message and notify them. When you have selected your preferences, click ‘send,’ and you’re done.
Your collaborators will now be notified by email of the shared access and will also see your message. You will also see that the action has been carried out by ‘access updated’ appearing over the form.
How to share a Google Form without edit rights
While we’re on the subject of sharing your form, you might be curious about how to share your Google form without edit rights with others.
If you’d like to share your form with people who can respond to the questions (respondents), you don’t need to grant them access that allows for editing and viewing responses.
Sharing your form with respondents is easy to do. However, you have a few options on how to do it. You can share it through an email or a link. You’ll also have the option to embed it on a webpage. Here are the steps:
Step 1: Go to the Google Form
Open the Google form you want to share. Navigate to your Google Forms by following any of the methods in Step 1 above.
Step 2: Click the Send button to open up Google Form share settings
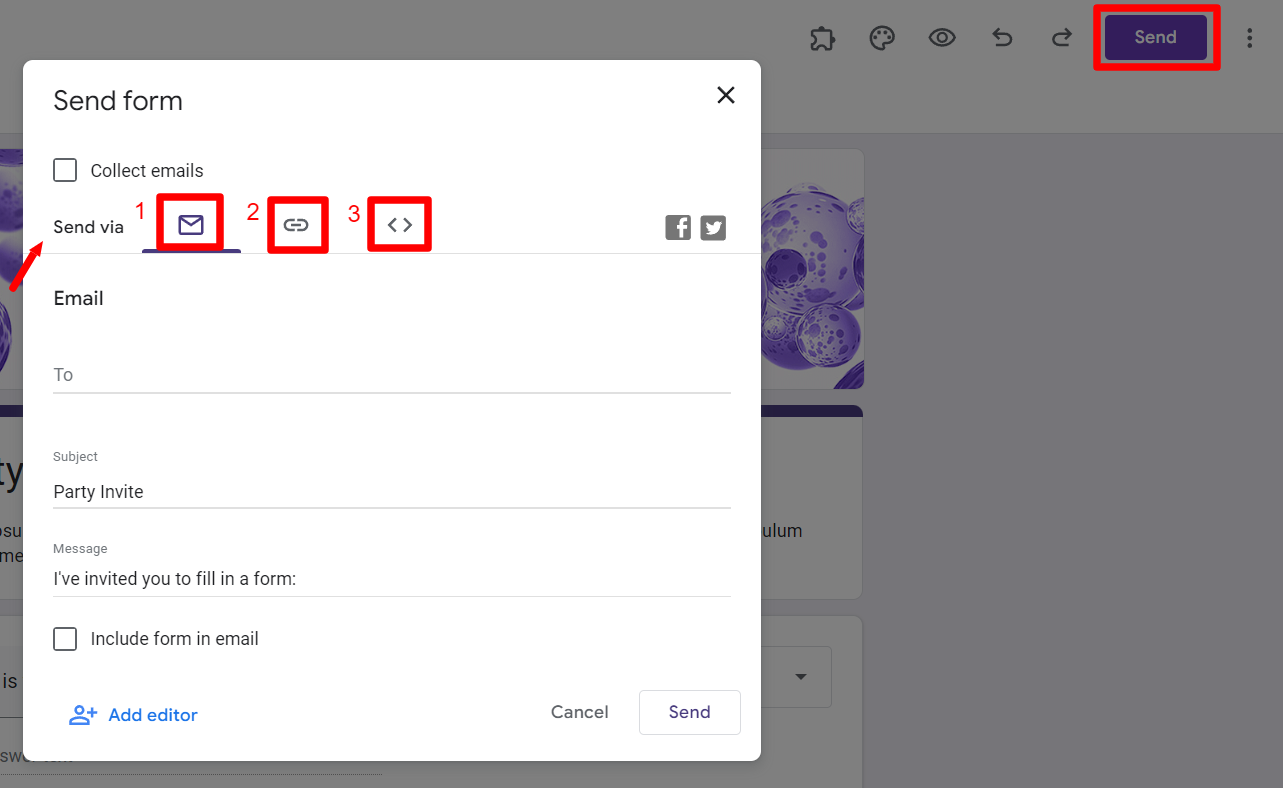
Once you open the form you want to share, click the ‘Send’ button in the top right-hand corner. This will open up a pop window with various options for sharing that form.
Step 3: Choose how to share your Google Form
Now is the time to decide how you want to share your form. You can choose from three readily available Google Form share settings, and you can also choose to share your form through social media.

The first option is to share the form through email. If you select this option, you must enter the respondent’s email address where it says ‘To.’
If you want the form to go with the email, just check the ‘Include form in email’ box. Select Send once you’re done, and the person will receive the form in their email.

The second option we'll look at is how to share a Google form link with others. You can use this option if you want to paste the link to your Google Form in a conversation or a text. Links tend to run long, so when you choose to share your form through a link, you can shorten that link. Click copy and paste it wherever you want, and just like that, you’ve shared your form.

The third option is to embed the form in a webpage where visitors can respond to your questions. This option offers you an HTML code and the ability to adjust the height and width of the form to fit within the site design.

Lastly, you can also share your form through social media. Just click the social media tab where you want to post your form. This will open up a new window where you must sign in. Now you can add comments and post your form for others.
Share Google Form responses with Form Publisher
So, there it is. It couldn't be easier to add collaborators to your form and share it with people. You can share your form by email, with a link, embedding it on a webpage, or even posting it on social media.
Once you have shared your form and collected responses, you can also choose to share those responses with others. Form Publisher can help you share your Google Form responses. Form Publisher is an add-on to Google Forms that takes your Google forms to the next level.
With Form Publisher, you can easily share a copy of responses with the respondents for them to view and even edit. You can also turn form submissions into professional documents and set up time-saving approval/rejection workflows for your organization.
So what are you waiting for? Form Publisher can achieve all this and more. It is free if you’d like to get started, and check out Form Publisher!