
Most commercially available applications, plugins, and extensions are designed to serve a large number of people. This means that they’re developed to serve common needs. However, sometimes, your individual need may be so specific and particular that the existing Google Forms add ons don’t meet your requirements.
Fortunately, Google has provided for this eventuality by creating Google Apps Script Editor. With Google Apps Script, you can develop your own Google Forms add ons. This is a Google Apps Script tutorial designed to help you achieve that goal.
What are Google Forms Add Ons?
Add-ons are customized applications that integrate with Google Workspace productivity applications, such as the Form Publisher add-on. Most Add-ons are built using Google Apps Script.
What is Apps Script Editor in Google Docs?
Google Apps Script Editor is a feature of Google Docs that allows developers to create applications to serve specific functions and objectives. Unlike most other coding languages, the coding in Google Apps Script Editor is quicker and less time consuming. The applications created through Google Apps Script are designed specifically to integrate and augment the inherent qualities of Google Workspace.
Most Add Ons are made in the Google Form Apps Script Editor
Most Google Forms Add-ons are built using script editor in Google Docs. In this Google Apps scripts tutorial, we will show you how to build the card for the Add-on with the script editor and some HTML.
In one of the previous blogs, I shared a detailed Google Apps Script tutorial on how to Limit Responses in Google Forms using Google Apps Script. In this part of the Google Apps Script tutorial, I am going to show you how to create Google Forms Add ons using the same Google Apps Script code that we had written.
If you haven't read the blog, check out the link below.
https://form-publisher.com/blog/limit-responses-in-google-forms-using-google-apps-script/
If you prefer to watch a video of this Google Form script tutorial instead of reading, we've got you covered:
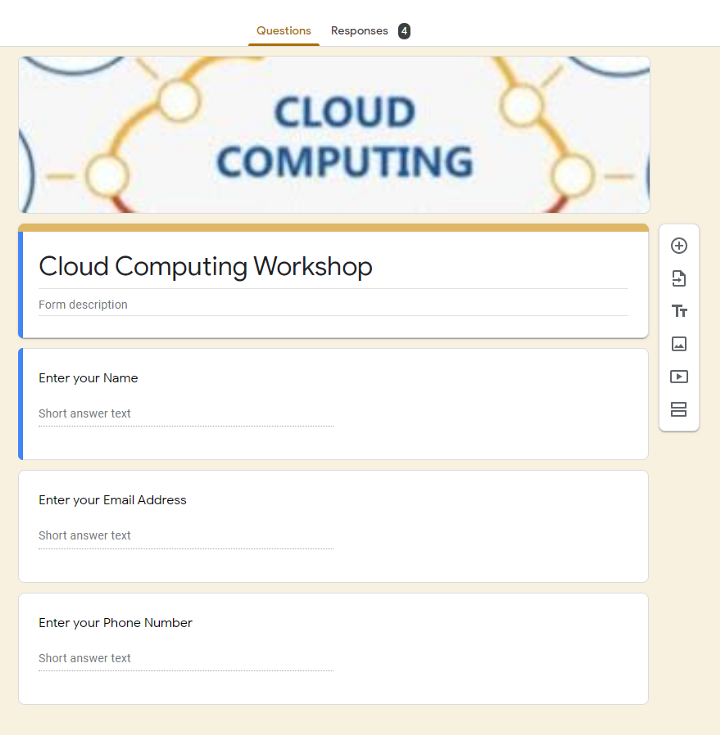
Step 1: Sample Google Form
The form that I will be using is a Simple Registration form. (If you prefer working with the Google Form click here).
The form contains the following details:
- Name of the Attendee
- Email Address of the Attendee
- Phone number of the Attendee
Step 2: Creating the Card with the Google Apps Script in Forms
Before we get to the app script in Google Forms, we are first going to create the Google Forms extension or Add-on card where the user will input the maximum responses.
While you are in the Form, launch the Apps Script Editor.
To do that:
(1) Click on 3 dots next to the Send button on the top right.

(2) Next click on the Script Editor option.
This brings up the Script Editor as shown below:
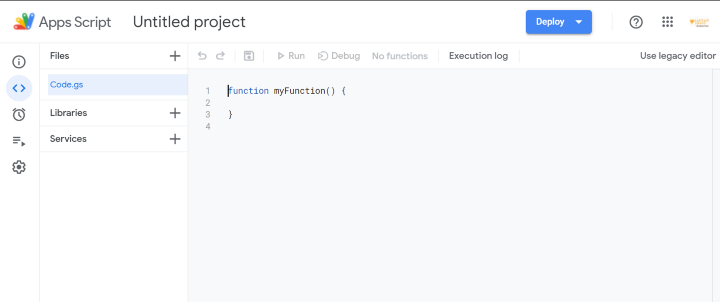
We have reached the Script Editor. Let’s Code.
To create the Google Form plugin or add-on card, our Google script language of choice will be HTML. To write HTML code, you have to open a new HTML file, to do that follow these steps :
- Click on the plus button, next to Files.

2. On clicking the plus button, you will be provided with two options: create a new Apps Script file or an HTML file.

3. Click on HTML and in a few seconds, an HTML file will get added to your Google Apps Script Project.

<div class="sidebar">
  <div class="block form-group">
    <p><b> Limit Form Responses</b> </p>
      <input type="number" id="max_responses" name="max_responses"   placeholder="Enter the Max Responses"/>
      <button class="blue" id="load_responses" onclick="openResponsesWindow()">Set Limit</button>
    </div>
  </div>


<script>

  function openResponsesWindow() {
    const maxVal = document.getElementById("max_responses").value;
    google.script.run.limit_responses(maxVal);
    console.log("function invoked");
  }

</script>
This is the HTML code that will be used to make the Add-on card.
<div class="sidebar">
<div class="block form-group">
<p><b> Limit Form Responses</b> </p>
Here we have created a div with the id sidebar. Since we are going to accept values from the user, we have to create a form. To do that, we have added the form-group that add some structure to forms. Next, we are adding some text to the card using <p>(represents a paragraph in HTML).
<input type="number" id="max_responses" name="max_responses" placeholder="Enter the Max Responses"/>
 <button class="blue" id="load_responses" onclick="openResponsesWindow()">Set Limit</button>
Here we have used the input to enter the maximum responses in the Google Form. Here we have specified the input type as a number, next we have specified the id and name of the input, which we will be using a bit later. Next, we have specified some text in the placeholder that will come before the input box.
Here we have created a new button with the ID load_responses. On clicking the button we have to run the Google Apps Script code that limits responses in Google Forms. Using the Onclick command we can assign the function that we want to run by clicking the button.
<script>
    function openResponsesWindow() {
        const maxVal = document.getElementById(“max_responses”).value;
        google.script.run.limit_responses(maxVal);
        console.log(“function invoked”);
    }
</script>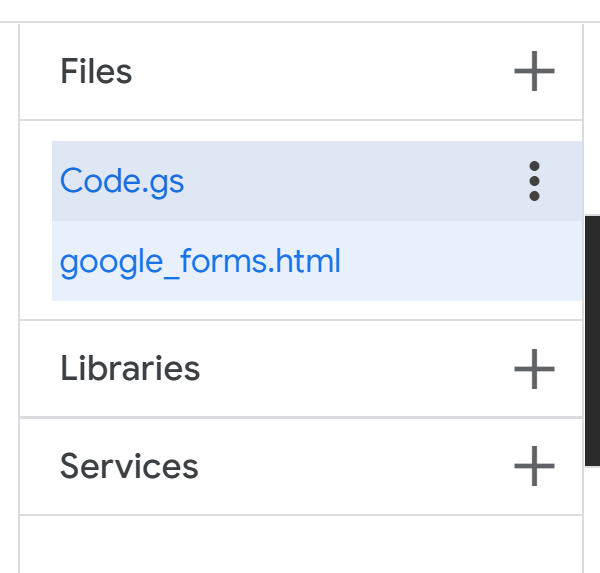
We are going to open the function that we passed in the Onclick command. Next, we are going to get the maximum responses and store it in a variable using the Document.getElementById, by passing the input function id. Using the google.script.run we will run the limit_responses function by passing the maxim responses variable.
We have completed the code for the Add-on card.
Step 3: Switching from HTML to Google Apps Script Editor
To switch back to writing Google Apps Script just click on code. gs file.
function onOpen(){
    FormApp.getUi().createAddonMenu().addItem('Open','show_sidebar').addToUi();

}

function show_sidebar() {
    const html = HtmlService.createTemplateFromFile("google_forms").evaluate().setTitle("Form Limitter Add-on");

    FormApp.getUi().showSidebar(html);

}

function onformsubmit(){
    const limit_value = PropertiesService.getDocumentProperties().getProperty("limit");
console.log(limit_value);
    const form = FormApp.getActiveForm();
    const responses = form.getResponses();

  //Logger.log("The maximum responses are : " + maximum_responses);
  const len = responses.length;

  Logger.log(len)

  if (len == limit_value){

    form.setAcceptingResponses(false);
  }

}

function limit_responses(maximum_responses){

  PropertiesService.getDocumentProperties().setProperty("limit",maximum_responses);

  const form = FormApp.getActiveForm();
  const responses = form.getResponses();
  //Logger.log("The maximum responses are : " + maximum_responses);
  const len = responses.length;
  Logger.log(len)

  if (len == maximum_responses){

    form.setAcceptingResponses(false);
  }
}
function onOpen(){
FormApp.getUi().createAddonMenu().addItem('Open','show_sidebar').addToUi();
}To open the Add-on in the Google Form, we have to get the UI of the Google Form, using the FormApp.getUi(). Next, we are going to create the Add-on menu using the .createAddonMenu() and pass in the sidebar id that we had previously created in the HTML part.
function show_sidebar() {
    const html = HtmlService.createTemplateFromFile("google_forms").evaluate().setTitle("Form Limiter Add-on");
    FormApp.getUi().showSidebar(html);
}
Here we are going to create the Template from the HTML file that we just created. Next, we are going to set the Title for the Add-on.
function onformsubmit(){
    const limit_value = PropertiesService.getDocumentProperties().getProperty("limit");
We have successfully created the template to write the code to accept the values from the user and store it in the variable.
Using the Properties service we are going to store the value that the user enters in the Add-on. The getDocumentProperties() command stores the data entered by the user in the Add-on. Next, we are going to use the getProperty command and store it in the limit_value variable.
  const form = FormApp.getActiveForm();
  const len = responses.length;
   Logger.log(len)
   if (len == limit_value){
   form.setAcceptingResponses(false);
   }
}
This part of the script has already been covered in the previous blog. If you haven't read the blog, click here.
Our code for the Add-on is complete.
Learn more about Google Apps Script here
Step 4: Check the Output with the Google Apps Script OnOpen Function
Our code is complete. Select the function OnOpen - of Google Script as shown below and run the program.

To see the Add-on, go back to your Google Form and click on the Add-on button.
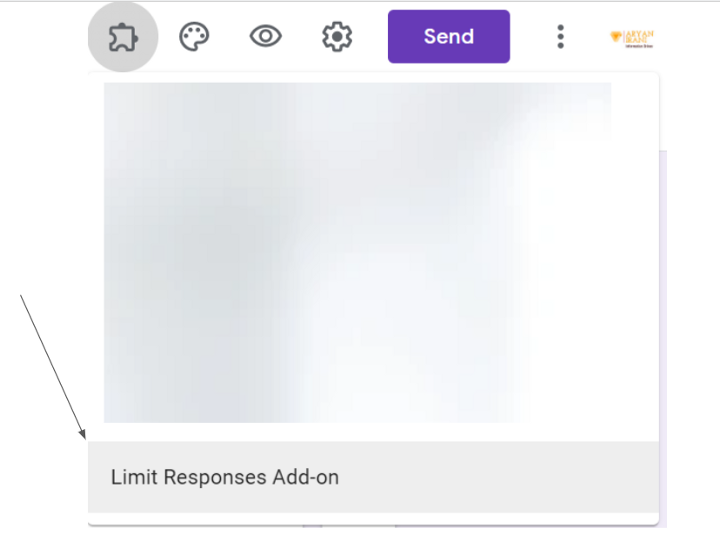
On clicking the Limit Responses Add-on you will get the following options.

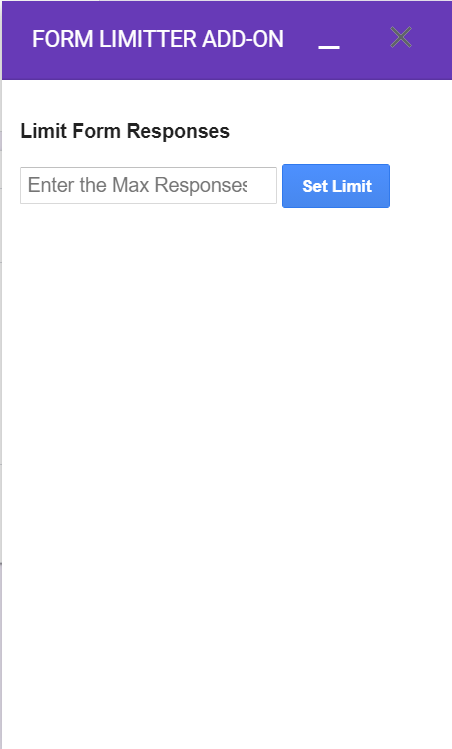
Click on Open, to start the Add-on. On successful execution of the script, you will see that the Add-on will appear on the right side of your Google Form.
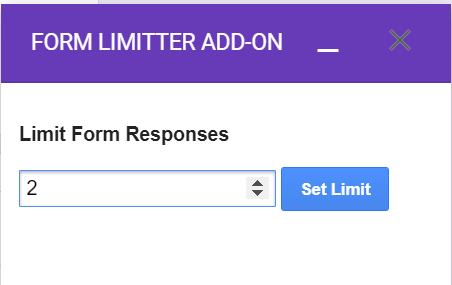
Here I have set the limit to 2 responses and clicked on the Set Limit button.
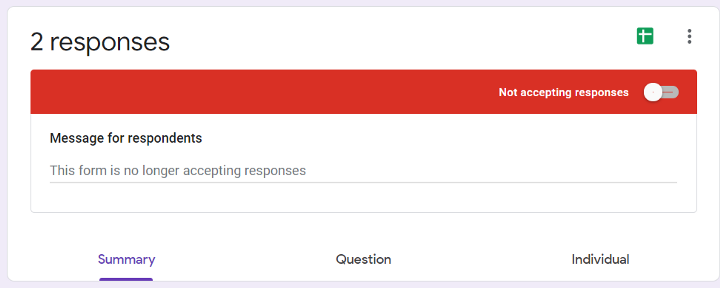
Here you can see that on reaching 2 responses the Google Form has automatically closed.
Creating Google Forms Add Ons with Google Apps Script Editor: The Google Apps Script Tutorial Summary
This app script tutorial showed you how to use the app script editor to build Google Forms Add ons that limits responses.
Hope you enjoyed the blog. Feel free to reach out if you have any issues/feedback at aryanirani123@gmail.com.