

There are times when you’ll need a signature for legal purposes when filling out forms. For many, Google Forms is their go-to form solution but are Google Forms legally binding? Without a signature in place, they’re definitely not. However, Google Forms with signatures can be considered to be more legally sound than web forms without signatures. Unfortunately, an e-signature tool is not a feature of the platform as of yet. So, is there a way to add a signature to a Google Form response?
In this tutorial, we'll explain how to add a signature in Google Forms in various ways including one where you can add a signature to a Google Form response document using the Form Publisher add-on. You'll be able to save time on paperwork while still getting all the information you need.
Does Google Forms have a signature option?
There's no built-in feature for electronic signature in Google Forms
There’s no built-in way to create a Google Form with the signature option for respondents. This means that if you want to use a Google Form for something like a contract or agreement, you'll need to find another way to collect signatures.
So, if there’s no default method to add a signature to Google Forms, then how do you get that elusive Google Forms signature? The simplest method would be to add a signature to Google Forms is to manually type in your name or initials at the end. While this may be enough for some purposes, it doesn't confirm the respondent’s identity, and it isn't legally compliant.
One option for making Google Forms with signatures is to use a third-party Google Form signature app that integrates with Forms, giving you the option of collecting signatures online. Another option is to print out the Form and collect physical signatures. Neither of these options is ideal, but they're the only ways to get around the lack of e-signature support in Forms.
Basic add-ons to create Google Forms with signatures
While Google doesn’t offer a built-in feature for Google Forms with signatures, some add-ons allow you to add signature widgets to your forms. These add-ons are available on the Google Workplace Marketplace.
So, how do signatures work in Google Forms when you’re using these add-ons and are they legally compliant?
All of these Google Form signature add-ons generally work by providing a box where a respondent can draw their signature rather than just typing their name.
While this can be a handy feature, that doesn’t mean it can track who wrote the signature and when, which is necessary for legal agreements. The best e-signature solutions for security and compliance are rarely free and usually involve you uploading your form to a different platform.
As such, if you are collecting sensitive information or require legally-binding signatures, it is best to use a dedicated e-signature solution rather than relying on an ordinary add-on for Google Forms.
Add-ons that allow approval workflows and Google Form signatures
When it comes to Google Forms, some add-ons can help you create approval workflows. Among the different ways you can streamline typical approval activities, you can also add signatures that correspond with form responses.
One such add-on is Form Publisher. With Form Publisher, you're able to add a step of approval for every submitted document. This can help you save time and keep track of important documents.
Because documents are created and signed by respondents, it's fully compliant from a legal perspective. Form Publisher can help to optimize your approval process and make sure that all of your documents are properly signed.
This is a great solution for businesses or organizations that need to get approvals from multiple people on various documents. The add-on makes it easy to track document status and who needs to sign off on what.
Plus, respondents can add comments to each form field so that everyone is on the same page. If there are any issues with the document, it can be quickly edited and resubmitted for approval. Overall, this is a convenient and efficient way to manage document approvals.
How to add a signature in Google Forms through Form Publisher Workflows
The first thing you’ll need to do is download the Form Publisher add-on. It’s free and available on the Google Workspace Marketplace. Once you’ve installed the extension, you’ll be able to create your approval workflows.
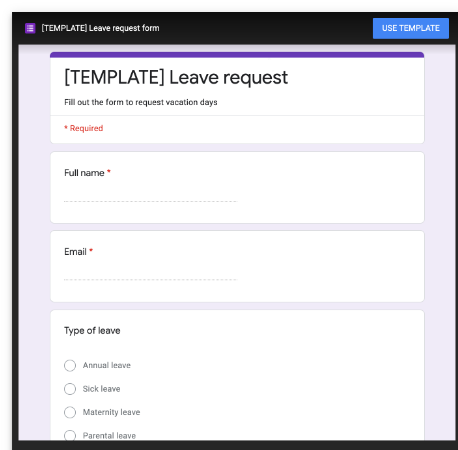
Step 1: Sign in to Google Forms and create a form
Sign in to Google Forms and create a new form or edit an existing one. You can create any type of form; for this example, we’ll use a Leave Request form.
Once you're done, it's time to activate the Form Publisher add-on.
Step 2: Enable Approval Workflow
Next, we will enable the Approval Workflow feature in Form Publisher. This will allow us to approve the generated documents. To do this, open your form in Google Forms and click on the "Add-ons" menu.
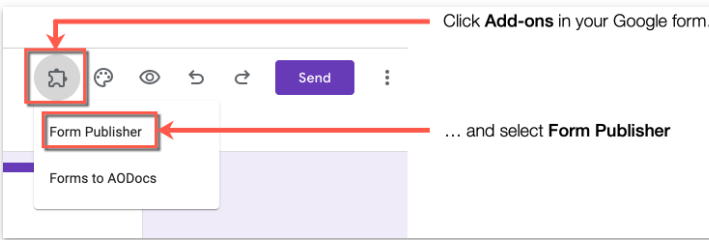
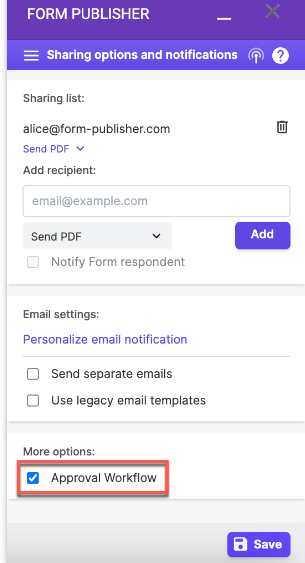
Select "Form Publisher" and then click on "Get started.'' It'll open the Form Publisher sidebar on the right side of the screen. Click on the "Template and markers" tab and scroll down to the "Sharing options and notifications'' section. Enable the "Approval Workflow'' option and click on "Save.''
Step 3: Add respondents as approvers
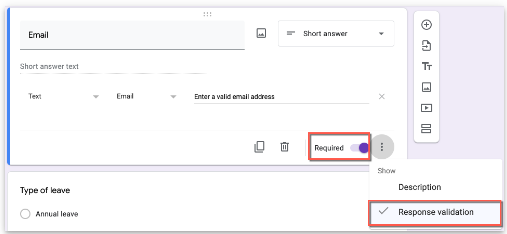
Now that the Approval Workflow feature is enabled, we can add approvers to our form. These are the people who will need to sign the generated document. Before we add approvers, we need to make sure that the email addresses of our respondents are included in the form responses.
To do this, go to the "Settings" tab of your form and scroll down to the "Collect email addresses" option. Make sure this option is enabled and you've added an email field to your form to collect respondents' email addresses. You'll also need to make sure that the email field is set to "Required" and that "Response validation" is enabled.
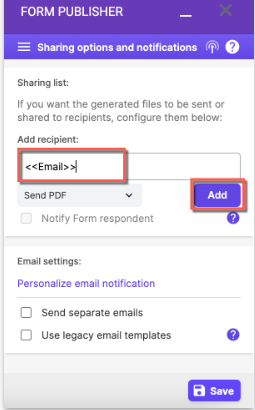
Once you've done this, go back to the Form Publisher sidebar and click on the "Sharing options and notifications" tab. Scroll down to the "Add recipient" section and type the email marker by using the following format:
<<Email>>
Once you've added the email marker, click on the "Add'' button. This will add the email field as an approver to your form.
You can add as many approvers as you like by repeating this step. Just make sure to add a new email field for each approver.
Once you've added all the approvers, click on "Save.'' Now your respondents will be approvers and receive an email notification with a link to their response document after submission.
Step 4: Add signature to Google Form with the workflow signature option
Finally, we need to add a signature field to the document that will be generated by Form Publisher. This feature will allow our approvers to sign the document electronically.
To add a signature field, open your Google Docs template and place your cursor where you want the signature field to be, and add the <<Workflow signature>> marker.
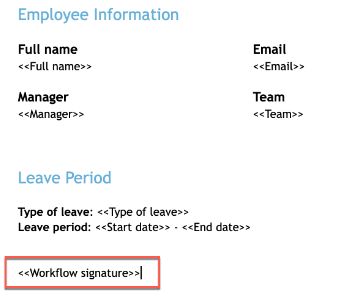
This feature allows users to draw their signature. Form Publisher replaces the <<Workflow signature>> marker with the signature image. So, make sure to allow enough space for approvers to sign the document.
That's it! Your Google Forms approval workflow and electronic signature features are now set up and ready to use.
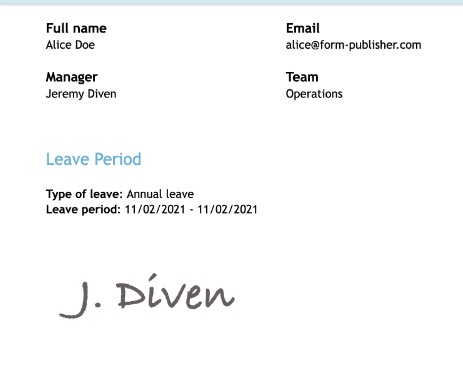
When a respondent submits your form, Form Publisher will generate a document and send it to them. Then, they’ll be able to approve the document and add their signature. This is one great way to add a legally compliant signature from a Google Form response.
Learn how to add QR codes to your Google Forms
Create Google Forms with signatures through Form Publisher
While the platform itself doesn't allow you to create a Google Form with signatures, you can easily enable an approval Google Form with a signature through Form Publisher. Form Publisher is a versatile tool that converts your responses into PDFs or spreadsheets while also adding an approval workflow and e-signature capability.
So if you're ready to start going paperless for important documents, give Form Publisher a try. You won't be disappointed!