

Creating and sharing an order form is essential for many businesses, as it helps to facilitate orders from vendors or suppliers. In this article, we'll teach you how to create a Google Forms order form for business and share it with vendors.
This step-by-step guide will help you get your order form up and running quickly, so you can start managing orders with ease. With just a few clicks, you'll be able to create an effective purchase order form that will make it much easier for vendors to order the items you need.
So let's create a free Google Forms order form!
How to create online order forms for business on Google Forms
An order form, also called a purchase order, is a form that a buyer submits to a vendor to request products and services. Since it’s filled out by the buyer, it needs to be easy-to-use and include all details they might need. In the following steps, we’ll show you how to create an order form on Google Forms.
Step 1: Create a new Google Form
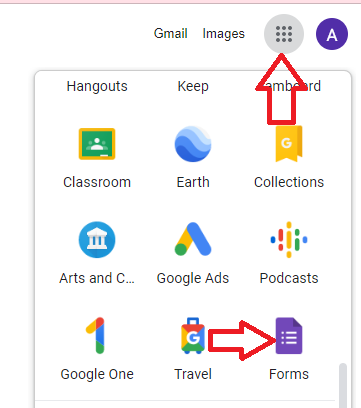
To create a Google Forms order form, we’ll first have to create a basic Google Form. You can do this by logging into your Google account and clicking on the ''Google apps'' icon on the top right of your screen. Then, select the ''Forms'' option from the drop-down menu.
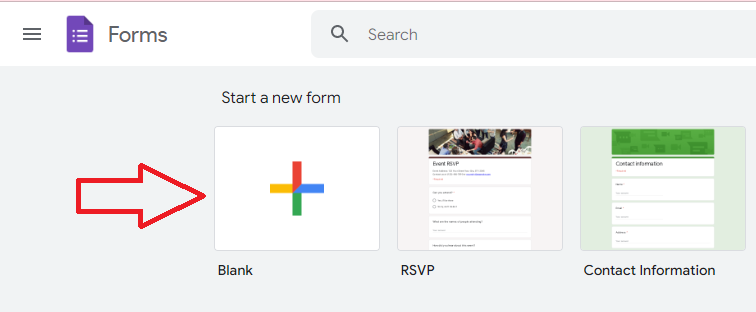
On the left-hand side of the forms page, you'll see a "+" icon. Click on it to create a new form. This will open up the editor, where you can make an order form.
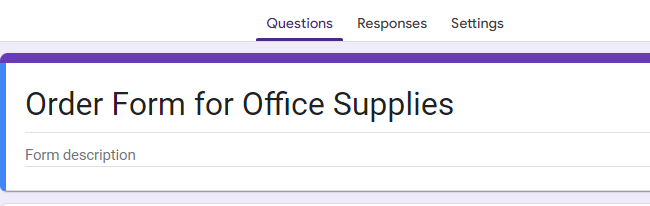
Give it a helpful title that relates to the items you're ordering, such as "Order Form for Office Supplies," “Clothing Order Form,” or even “Baking Order Form” in the ''Untitled form'' box. You can also add a description to help you further explain the purpose of the form.
Step 2: Add all necessary fields
Next, you'll need to add all of the fields you want vendors or stakeholders to complete in your purchase order form. Depending on what the order includes, this could include fields like:
- Item name
- Item description
- Item quantity
- Preferred delivery date
- Discounts and tax adjustments
- Payment terms
- Personal and contact information
- Delivery address
- Unit price and total price
- Payment method
For the purpose of this tutorial, we'll assume that you're creating an order form for office supplies. So, you should add fields such as item name, description, quantity, and unit price.
Google Forms offer several question types, such as checkboxes, drop-down lists, and multiple choice. Make sure to select the appropriate type for each field.
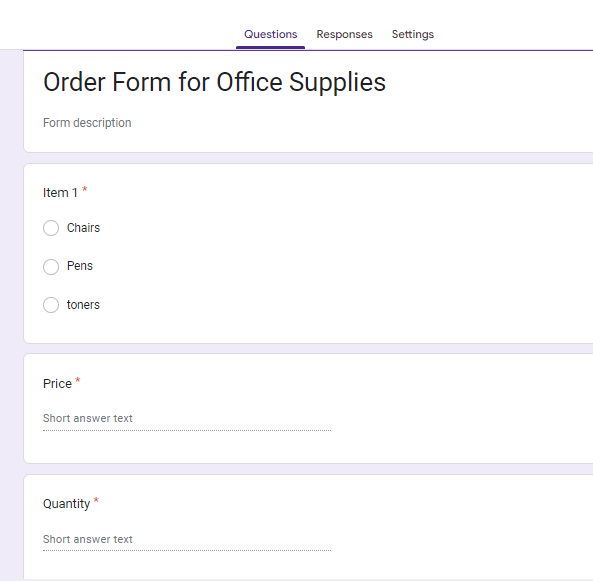
You can use multiple-choice options for items and checkboxes for quantity, and you can add a comment box if you want vendors to provide additional information.
You should also add images or videos to your order form to help illustrate the products being ordered. This is a great way to provide visual context for products and make it easier for stakeholders to understand what they're ordering.
If you’d like a template to get you started, there is an order form template in the Google Forms Template Gallery!
Step 3: Customize the look of your purchase form
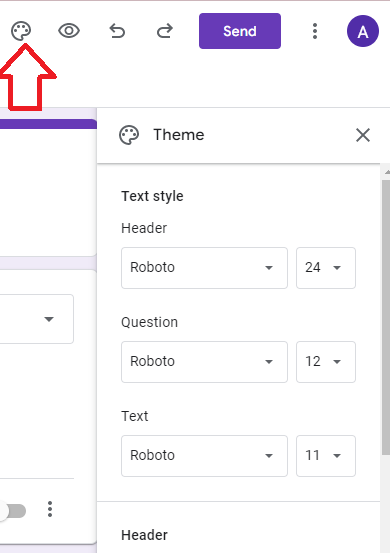
You can also customize the look of your order form to make it more visually appealing. Google Forms offers several customization options that you can use to give your form a unique look.
For example, you can change the background of your order form to match your company's branding or add logos and images to make it stand out. You can also customize the font type, size, and color of your form's questions and answers.
To get started with customizing your form, go to the ‘’Themes’’ tab in Google Forms and select a template that fits your needs. Then, you can customize the template to your liking with the available customization options.
Click here to learn how to add an image header for your Google Forms
Step 4: Select a response destination
When you're done customizing the look of your Google Forms order form, it's time to select a response destination. This is the place where all of the responses will be saved and analyzed. You can choose an existing Google Sheet or create a new one.
To do this, go to the ‘’Responses’’ tab in Google Forms and click the three-dot "More" icon in the top-right corner. Then, select the "Select response destination" option to save all the responses in a Google Sheet.
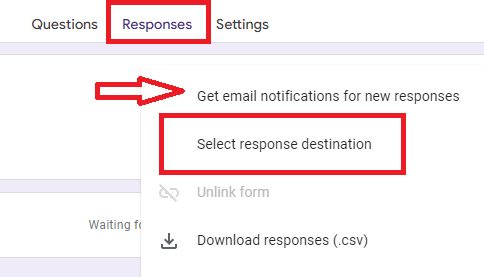
You can also choose to receive email notifications when someone completes your order form by selecting the "Get Email Notifications for new responses" option. This allows you to stay up to date on the responses and take action accordingly.
That's it! You now know how to create a Google Forms order form for business that you can share with vendors and stakeholders. You can use this technique to create a free order form for various purposes such as:
- T-shirt order forms
- Restaurant order forms
- Menu order forms
- Drink order forms
- Lunch order forms
- Baking order forms
Now, let's take a look at how Form Publisher can help you share and analyze the responses quickly and easily.
Use Form Publisher to make an order form and share it
Having them submit an order form is a great step, but you might also want to share with the buyer a document of what they’ve filled out. This can prevent instances of errors and creates a transparent transaction. How can you do that? With Form Publisher!
What is Form Publisher?
Form Publisher is a Google Forms add-on that lets you easily share and manage your order forms. With Form Publisher, you can turn your order forms into professionally designed documents such as PDFs and Microsoft Word documents.
Form Publisher makes it easy to share your order forms with vendors and other stakeholders. You can also add branding elements or customize the layout of your documents for a more professional look.
Plus, Form Publisher can help you streamline the ordering process by automatically generating documents based on your order forms. This makes it much easier to track orders and ensure they're being processed properly.
How can Form Publisher be used to create a free order form online and share related documents?
Creating and sharing order form documents with Form Publisher is easy. All you have to do is connect your Google Form with the add-on and select the type of document you want to generate.
Next, you can customize who will receive the document. You can choose to send it to a single recipient or multiple recipients, such as internal stakeholders and vendors.
Finally, Form Publisher will automatically generate the document and share it with your chosen recipients. You can even set up automatic notifications to keep everyone informed about order status updates or changes to the form.
Download Form Publisher for free today
So, there you have it – with Google Forms and the Form Publisher add-on, you can quickly and easily create order forms and share them with vendors and other stakeholders. And best of all – you can get started for free with Form Publisher. Download it today and start creating custom order forms in no time!