
It's no secret that Google Forms has become one of the most popular tools for educators in recent years. With its easy-to-use interface and powerful features, it's no wonder so many teachers are using it to create quizzes and assessments for their students.
But what about grading Google Forms? Is there a way to do it?
The short answer is yes! In this article, we'll show you how to grade Google Forms so you can get the most out of this amazing tool.
So, let's get started!
How to grade a quiz on Google Forms
Step 1: Create your Google Form
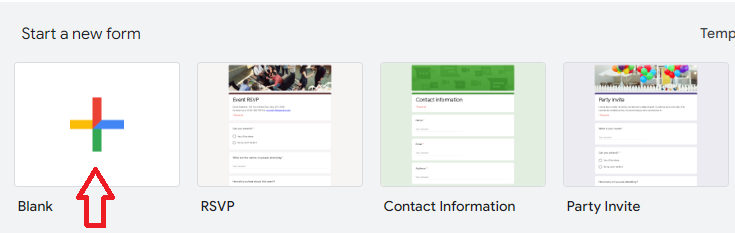
To get started, open up Google Forms by going to google.com/forms. Then, click the "+" icon in the top-left corner to create a new form. It'll open up a new page with blank fields for you to fill out.
The first thing you'll want to do is name your form at the top. This will be the name that people see when they're taking the quiz, so make it something descriptive like "Spring Quiz."

Step 2: Make it a quiz
Now that you have your form, it's time to turn it into a quiz. To do this, click the "Settings" tab in the top-right corner. A new page will open with a few options for you to choose from.
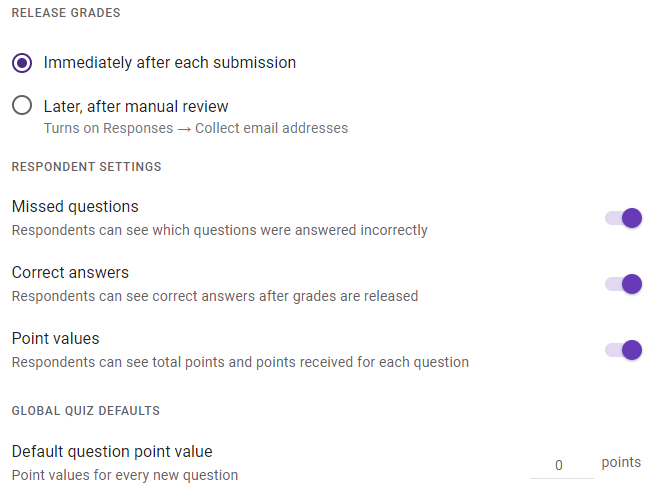
At the top, check the box next to "Make this a quiz." This will give you some new options to work with such as "Release Grades," "Respondent settings," and Default question point value.

- From ''Release Grades,'' you can determine if grades are released immediately after the quiz is submitted or if you want to release them manually.
- Under ''Respondent settings,'' you can choose whether people taking your quiz can see their missed questions and correct answers after they finish or if they can only see their score.
- The ''Default question point value'' is how many points each question on the quiz is worth. The default is normally “0.” You’ll still be able to change individual question values later.
Step 3: Create your quiz and answer key
Now that you have your quiz settings all set up, it's time to start creating the quiz itself. Begin by adding a question in the "Question" field and choose the type of question from the drop-down menu.
You can add as many questions as you want, and there are a variety of question types to choose from such as multiple choice, short answer, checkboxes, etc.

Once you've added all of your questions and answers, it's time to create your answer key. To do this, click on the "Answer key" button in the bottom-left corner. A new page will open with a list of all the questions you've created.
For each question, select the correct answer from all the included options.
You can also assign a point value to each question if you want to weigh certain questions more than others.
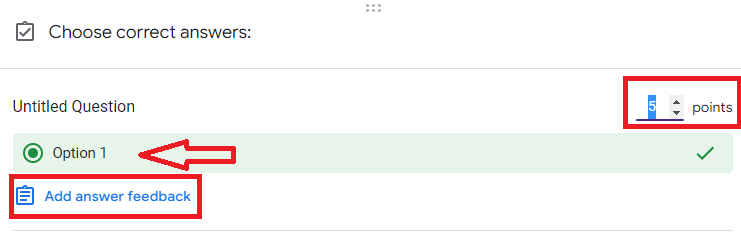
Google Form also allows you to add feedback for each question. This feedback will be seen by people who take the quiz and might help them understand why they got a question wrong.
To do this, click the "Add answer feedback" button next to each question. A new field will open up where you can type in your feedback for “Correct Answers” and “Incorrect Answers.” For example, you could type "Great job!" for correct answers and "Sorry, that's incorrect" for incorrect answers.
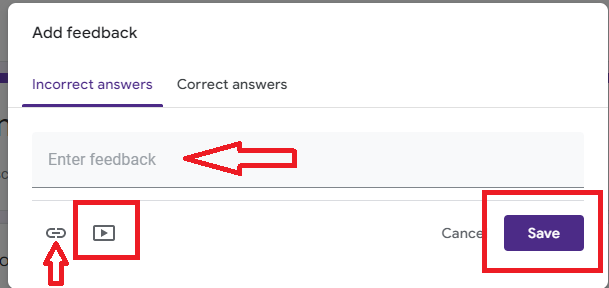
You can also add YouTube videos or images to your feedback for those that are visual or auditory learners. Once you're finished, click on the "Save" button in the bottom-right corner of the feedback page.
Step 4: Send out quizzes to students
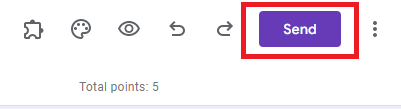
Now that you've created your quiz and answer key, it's time to send it out to your students. To do this, click on the "Send" button in the top-right corner. A new page will open with a few different options for you to choose from.
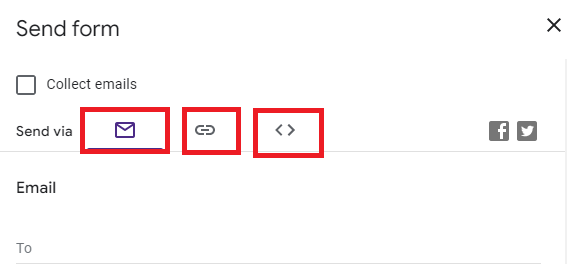
You can send out your quiz via email, social media, or a link. You can also embed your quiz on a website or blog.
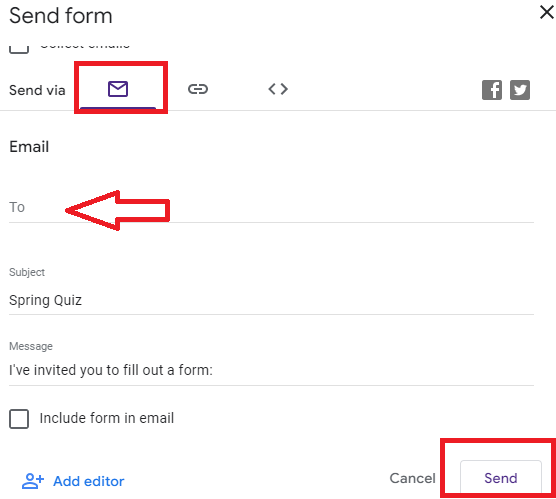
If you're sending it out via email, simply type in the email addresses of the people you want to send it to and click on the "Send" button.
If you're sending it out via a link, copy the link and send it to people however you want.

If you're embedding your quiz on a website, copy the code provided and paste it into the HTML of your website or blog.

Great! You've now successfully created and sent a quiz using Google Forms. Now, it’s time to wait for results to come in.
Step 5: Observe the results
Once people have started taking your quiz, you can view the results by clicking on the "Responses" tab in the top center of the page. From there, you can see how people are doing on each question and filter the results by date or by person.
Google Form will show you three tabs: Summary, Questions, and Individual.
- The Summary tab will show you the total number of responses, the average score, the median score, and the mode score.
- The Questions tab will show you how people are doing on each question. This is useful for seeing which questions people are struggling with.
- The Individual tab will show you the responses of each person who took your quiz. This is useful for seeing where people made mistakes and for giving feedback to individual people.
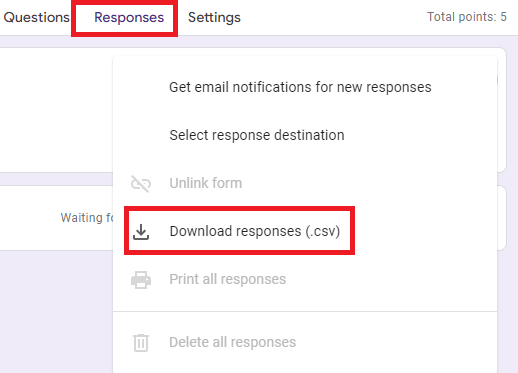
When looking at the results, you can also choose to download them as a CSV file or an Excel file. This can be useful for further analysis or for sharing with others.
Learn how to sort your Google Form responses here
Step 6: Grade quizzes and submit feedback
Now it's time to evaluate student performance and understanding on a quiz. To grade quizzes in Google Forms, you can either do it manually or automatically.
We've discussed the automatic grading in the ''Create your quiz and answer key'' step, so let's focus on how to grade questions by hand.
Google Forms offers two ways to grade questions by hand. First, you can go into the individual responses and manually award points for each question. Second, you can go for ''question-by-question'' grading on the same page.
Here's how to do both:
To grade individual responses:
- Open your form in Google Forms and click on the Responses tab.
- Click on the ‘’Individual’’ tab and open the question you want to grade.
- Give the student a point value for their answer and add any feedback to missed questions in the ‘’Add Feedback’’ box.
- Click ‘’Save’’ when you've entered your feedback and go to the bottom of the page to click ‘’Save’’ to keep your changes.
Grading question-by-question is a great way to get an overview of student understanding and identify any areas that need more clarification. To grade question-by-question:
- Open your form in Google Forms and click on the Responses tab.
- Click on the ‘’Questions’’ tab and award points for each answer. Here, you can award full, partial, and no credit.
- Give the students feedback in the “Add Feedback” box.
- When you're finished, click ‘’Save’’ at the bottom of the page.
Show your Google Form responses in a chart
How to share grade results with students
Once you've graded your quiz, it's time to share the results with your students. Google Forms offers a few different ways to do this:
Send them their Google Form results automatically
When you create your quiz, you have the option to send students their results automatically. To do this, click on the ‘’Settings’’ tab and go into the ‘’Make this a quiz’’ section.

Scroll down and find the ''Release Grades‘’ section. From there, select the ‘’immediately after each submission’’ option, and your students will automatically receive their results after they finish the quiz.
Send them their Google Form results manually
If you don't want to send results automatically, you can also do it manually. To do this, click on the ''Send'' button. From there, you can choose to send your results to specific students or all of your quiz-takers at once by entering their email addresses.
Send your students a beautiful grade report with Form Publisher
So, there you have it! You now know how to grade a quiz on Google Forms. We hope that this guide was helpful and easy to follow. There’s another way to send students grades, and that’s through a well-crafted grade report. You don’t have time for that, though, do you? With Form Publisher, you do!
Form Publisher can help you create more from your Google Forms. Form Publisher is a Google Workplace add-on that automates the process of creating documents with Google Forms. Form Publisher also offers a wide range of customization options (depending on your pricing plan), so you can have beautiful grade reports to share with your students!
It’s important to note that some questions can't be scored in the document if you’re using Form Publisher for a quiz. Form Publisher uses Google Apps Script to gather scores, and there’s no way to access scores of grid questions—multiple choice grid and checkbox grid—using it. This also applies to all question types that require manual grading. Because of this, these questions will be marked as “0.”
Install Form Publisher now to get started!