
Google Forms has taken virtual learning by storm because of its compatibility with Google Classroom and ease of use. If you know how to use Google Forms as a quiz and are creating one for your class, then by learning how to grade a Google Form automatically by adding correct answers can make your life much easier.
Curious about how to make an answer key in Google Forms? In this tutorial, we’ll show you how to add the correct answers to Google Forms and the many benefits of doing so.
Learn how to create fillable forms in Google Docs
How to Put Correct Answers in Google Forms
Step 1: Make your Google Form a quiz
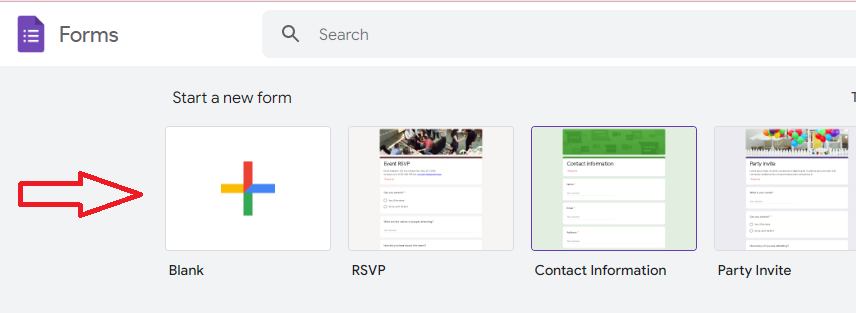
If you want to add the correct Google Form answers, the first thing you need to do is to learn how to make a Google Form quiz. To do this, create a new form by going to Google Forms. You can create a blank quiz or choose from one of their education templates.
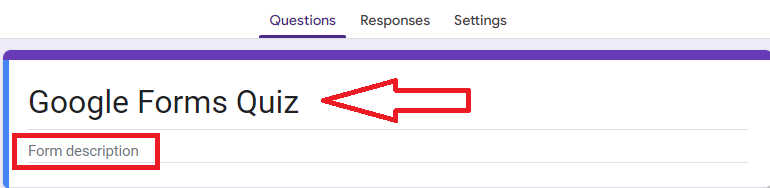
Once you’re in your new form, you’ll be given the option to add a title and description. The description is optional, but you may want to put directions for your students here. For our example, we'll call our form "Google Forms Quiz."
Next, click on the ''Settings'' tab from the top menu. At the top of the page, you’ll see a toggle that says "Make this a quiz." Click it on. If you don’t make the form a quiz, you won’t be able to add correct answers later!
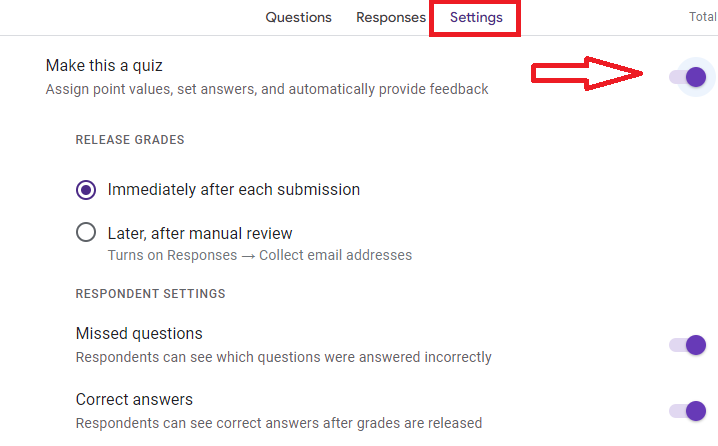
It'll open up some new options for you to fill out. You can select whether you want to release grades immediately or manually and whether you want to show correct answers after the form is submitted. Feel free to save this until after you create your quiz just in case you add some questions that require manual grading.
Step 2: Add good Google Form questions
Now that your form is a quiz, it's time to add some good Google Form questions! Click on the ‘’Question’’ tab and start filling them out.
In the drop-down menu next to each question, you’ll see a list of question types that you can add to your forms such as multiple choice, short answer, or paragraph.
For our example, we'll add a multiple-choice question. To do this, click on the "Multiple choice" option, and answer choices will appear on the right-hand side of the screen.
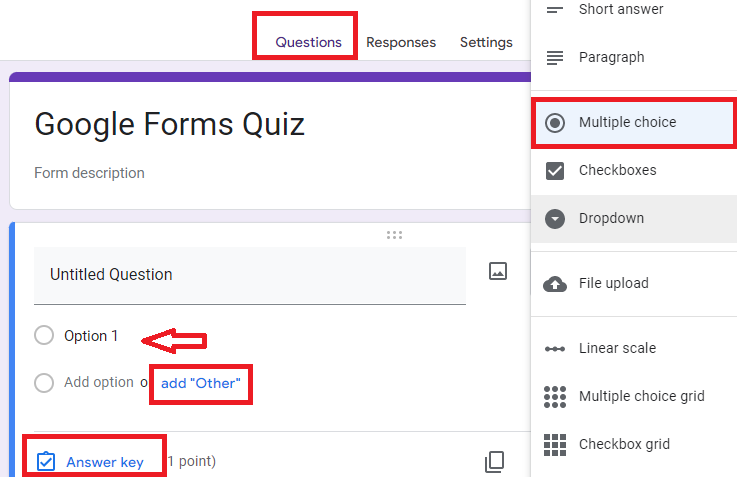
You can now type your question into the "Untitled Question" box and add your Google Forms answer options in the "Choices" section. You can add as many answer options as you want, but try keeping it to a maximum of five so students don't get overwhelmed.
Step 3: Open up the answer key
Once you've added all of your questions, it's time to add the correct answers to the form. To do this, click on the Google Forms "Answer key" option that appears at the bottom of each question.
A new page will open up that shows all of the questions on your form and allows you to add the correct answers. For each multiple choice question, fill in the bubble of the correct answer.

For short answers, put in a few variations of the correct answer just in case students mistype it. For example, if the answer is "Google," you might also want to put in "google" and "GOOGLE." That way, students will still get credit even if they don't capitalize the company's name correctly.
There isn’t a way to grade paragraph answers automatically in a Google Forms quiz with the answer key. If you add these to your quiz, you’ll have to grade them manually.
You can also assign a point value to each question by clicking on the "Points" field. If your quiz isn’t for a grade, keep this value as zero.
Step 4: Add a feedback message for correct and incorrect answers
The last step is to add a feedback message to each question. This is optional, but providing feedback can help a student understand why they got a question wrong. Similarly, you can use this option to praise your students when they choose the correct answers.
To do this, click on the ‘’Add answer feedback" option at the bottom of each question and it’ll open up a new box.
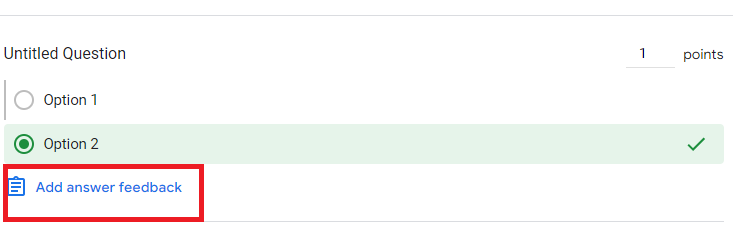
For each answer, you can add a different feedback message for incorrect and correct answers. For a correct answer, add some praise like "Great job!" or "Correct!" For incorrect answers, you can say something like "Sorry, that's not quite right” or offer more in-depth explanations.
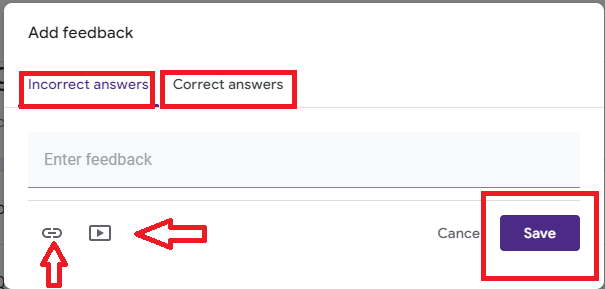
You can also add an image or video if you want to make your feedback more engaging. Once you’ve done adding your feedback, click ‘’Save’’ to save your changes.
Step 5: Click "Done"
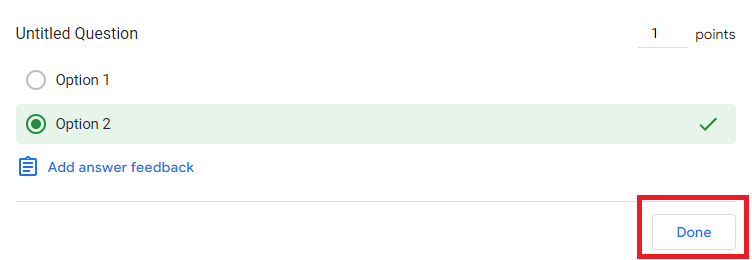
Once you've added all of your question's correct answers and feedback messages, click on the "Done" button in the bottom right-hand corner.
Boom! You've now successfully added the correct answers to your Google Form and your form is now ready to be shared with respondents. Remember to go back and change “Release Grades” and “Respondent Settings” if you haven’t already.
As respondents submit their answers, they’ll be able to see whether they got each question right or not.
Is your Google Form not submitting? Learn how to troubleshoot here.
Benefits of using an answer key in Google Forms
Students get instant feedback
First, it allows you to give immediate feedback to respondents. When correct answers are added and "Release Grades" is immediate, students get the feedback they need right after they submit. This makes it so they aren't stressed waiting for an answer.
If you have a large class, it can take a lot of time to answer everyone’s questions. By adding correct answers and feedback to your quizzes automatically, you can spend more of your class time reinforcing that knowledge. Also, instant feedback helps your students reinforce their knowledge on their own right after submitting, meaning they’ll retain it easier.
Automate your grading process
Secondly, it allows you to automate your grading process. Grading quizzes by hand takes a huge chunk of your precious time. Without having to circle each incorrect answer manually, you’re giving yourself more leeway as an educator—and saving your hand some pain!
With Google Forms, you can create quizzes easily. By adding correct answers, you can move on to the next item on your lesson plan quickly. If you have a large class, this is surely a match made in heaven.
Send students personalized grade reports with Form Publisher
As a teacher, you’re probably looking to make your grading process quick and fresh. If you want to take things a step further, you can use the Form Publisher add-on. Form Publisher generates a personalized document filled with form responses that you can send to your students. This will be a lot easier for students to read!
To use Form Publisher, select it from the ''Add-ons'' menu, choose your preferred output format (PDF or Google Doc), and choose who will receive the document. Form Publisher will take care of the rest! You can even choose which folder you’d like that document to go.
Ready to try it out? Install Form Publisher today!