

If you’re looking to collect data for different types of surveys, you must’ve heard of Google Forms. Using Google Forms to collect data is extremely efficient regardless of whether you want to create traditional surveys, Google questionnaires, or polls. It’s easy to use and integrates well with other Google products such as Sheets and Docs.
In this guide, we’ll show you how to make a Google Form survey from start to finish. We’ll provide some ways to improve your Google Forms, and we’ll also discuss some of the ways that Google Forms can be used.
Creating a Google Form is easy! Simply follow these steps.
How to create a new Google Form survey
Step 1: Go to Google Forms
The first step is to open Google Forms. You can do this by going to forms.google.com in your web browser, or by going to Google Drive and selecting "New" > "Google Forms.”

Step 2: Pick from different Google Forms survey templates
Next, you can select a template. The Google Forms platform offers many different types of Google Forms survey templates to choose from, so you can pick the one that best suits your needs. There are templates for RSVP, Contact information, Party invites, and more!
However, If you’re unsure of which template to use, you can always start with the ‘’Blank’’ template.

Step 3: Change the title of your Google Form survey
After you have selected a Google Form survey template, the next step is to change the title of your form. To do this, click on where it says "Untitled form" text at the top of the page and enter a new title. For example, you could title your form "RSVP for My Birthday Party" or "Contact Information Form."
You can also add a description to your form if you want to provide the responder with more context. To do this, click on the "Form description" text box and enter a short description of your form that will appear below the title.

Step 4: Adjust questions and answers in your Google questionnaire
Once you have given your form a title and description, it's time to start adding questions to your Google questionnaire! Google Forms makes it easy to add a variety of different question types, including multiple-choice, drop-down, short answers, and more.
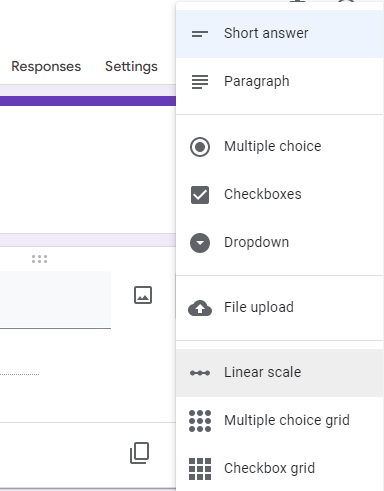
To add a question, simply replace the "Untitled Question" text with your question and then click on the answer type that you want to use. For example, if you are asking for someone's name, you would select the "Short answer" answer type.

Google Forms also allows you to include images and videos in your questions. To do this, click on the image or video icon from the question toolbar.

Once you’ve added all of the questions that you want, it's time to move on to customizing the form to your liking!
Step 5: Preview the Google Form survey you've created
Before you share your form with the world, it's a good idea to preview it first. To do this, simply click on the "Preview" button from the top-right corner of the page.
This will open your form in a new tab, and you can test out all of the questions to make sure everything is working as it should.

If you’re happy with the way your form looks, it's time to move on to sending it out!
Step 6: How to Create a Google Forms links or share through email
The final step is to share your form with the world! To do this, click on the "Send" button from the top-right corner of the page.
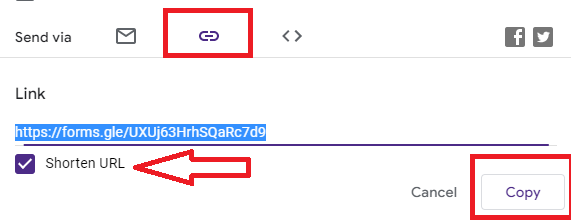
This will open a sharing dialog, and you can choose to send your form via email or share it via a link. You can also embed your form on a website if you want.

If you are sending your form via email, simply enter the email addresses of the people who you want to receive your form, add a subject and message, and then click on the "Send" button.

If you’re sharing your form via a link, simply copy the link and share it with people through email, social media, or any other method. However, make sure to shorten the link if you are sharing it online, as the default link can be quite long.
And that's it! You have now learned how to create a form using Google Forms.
How to make your Google Form even better
Step 1: Adjust important settings
The default settings of your new Google Form may suffice, but there are many different settings to adjust that are worth looking into. If you chose a template initially, some may have already been adjusted for you. To adjust settings, simply shift over to the Settings tab on your form.
For example, you can make your form a quiz. Making a Google Form a quiz means you can add correct answers to responses and provide points for those answered correctly. This is very valuable for teachers creating online quizzes for their students.
Here are some important settings you may want to adjust:
- Collect email addresses: Have this on if you want to know whose answer was whose, but turn it off if you want your form to be anonymous.
- Send respondents a copy of their responses: If you want the respondent to have a reference for what they answered, this is one way to do that. A better alternative, though, is to use Form Publisher
- Limit 1 response: This setting makes it so one user can only submit one response to your form. This is great for limiting duplicate responses.
- Allow response editing: This setting allows the respondent to go back in and change their answers after submission.
- Presentation settings: There are many presentation settings available, including a progress bar and the ability to customize the confirmation message after submission.
- Make questions required by default: This is a very handy setting since it checks off the “required” setting for questions automatically, meaning you don’t have to do so manually.
Step 2: Lay it out with sections and logic branching
Another way to improve the formatting of your Google Form, especially if it’s longer, is to break it up into sections. Certain types of questions can be held under one section, which functions essentially as a page when the respondent is filling out the form. To create a section, you just need to click the “Section” button where you want the form to be split off.
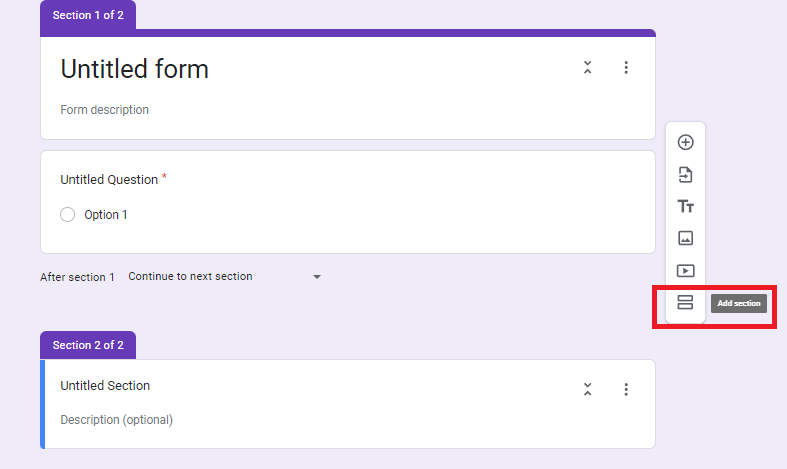
Another feature that comes into play here is conditional formatting. Essentially, this means that you can make certain section optional depending on the choices that respondents make earlier in the form. Learn what you need to know about skip logic branching and conditional formatting in our guide.
With sections and logic branching, you can improve the flow of your form while helping the respondent understand its contents.
Step 3: Change up the theme
A fantastic way to improve your form overall is to improve its appearance. Google Forms have many kinds of theme settings, allowing you to customize how your form looks. You may want to differentiate between forms or match the form to your branding. There are numerous ways to change up the appearance, but you’ll need to click on the Theme button first (it looks like a palette).

Here are some of the many ways you can change the appearance of your form:
- Color scheme
- Images (including a header image)
- Font (type, size, etc.)
How to use a Google Form
Step 1: Connect your form to a Google Sheet
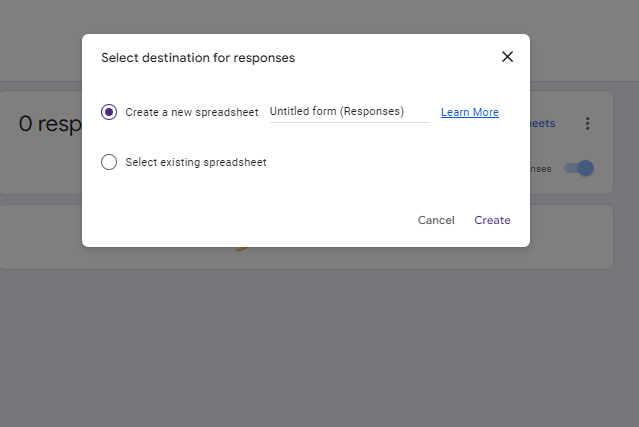
Once you’ve created your form, it’s a good idea to connect it to a Google Sheet. While the responses can be stored on the form itself easily enough, viewing and handling data through a spreadsheet format can be very helpful, especially when you factor in the many formulae that Sheets offer. You can also create better graphs and charts than the default ones.
To link your Google Form with a Google Sheet, all you need to do is go to the Responses tab and click the Google Sheets icon. You can then choose whether you want to create a new spreadsheet or choose an existing one.
Curious to know more? Check out our guide on connecting your Google Form to a Google Sheet.
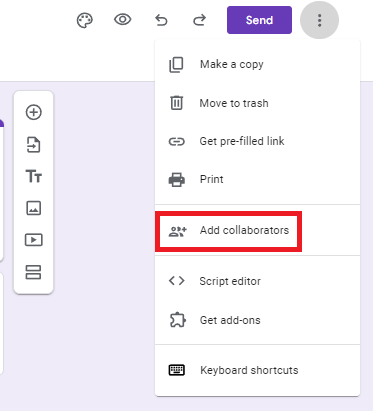
Step 2: Add collaborators
Working with someone else on your team? Need your supervisor to review form responses? You should add them as collaborators. This is easily done by going to clicking open the additional options (three dots), clicking “Add collaborators”, then entering their email address(es).
Learn more about adding collaborators to Google Forms here.
Step 3: Share it with respondents to capture submissions
As described above, you can share your form with respondents in three ways: link, email, or embedded on your website. However you choose to share your form, make sure they have access to it and that your form is open for submissions.
Then, you should be able to analyze your survey responses. As the responses start to flow in, make sure you’re evaluating them to see if the answers are what you were anticipating. If they aren’t, you may want to reword a question or change its type.
Step 4: Use add-ons to improve Google Form use
The default capabilities of Google Forms are mighty, but there’s so much more to see when you factor in the sheer amount of add-ons to choose from. Most add-ons are completely free, and while some add small features that the native version lacks, some add-ons can completely change Google Forms functionality.
Form Publisher, for example, can create automated approval workflows in Google Forms by generating response documents and sending them automatically to those you choose. Advanced Summary makes the response breakdown more, well, advanced: better charts and graphs, search filter capabilities, and more.
If you want to create Google Forms with untouched functionality, try add-ons!
Creating an online Google Form survey for different purposes
Google Forms can be used for a variety of purposes, such as creating surveys, collecting customer feedback, or event registration. Let's take a closer look at some of the ways you can use Google Forms.
Creating traditional Google Form surveys
Data collected through surveys can be used to improve products or services or to understand customer sentiment. Surveys can also be used to collect valuable feedback from employees.
In addition, you can use Google Forms to track responses in real-time. This way, you can see how many people have responded to your survey and what their responses are. Google Forms provides users with automated graphs and charts from responses.
However, the best way to analyze your results and make decisions based on them is to use a tool like Form Publisher. With Form Publisher, you can automatically generate beautiful PDF or Word documents from your form responses, making them easy to share with your team or print out for your records.
Need to duplicate your Google Form? Click here to learn how.
Making a Google Form survey for collecting RSVPs for an event
To help you keep track of who is coming to your event, you can use Google Forms to collect RSVPs. Simply create a form with the relevant questions (name, email, number of guests, etc.) and share it with your attendees.
Then, when people RSVP, their responses will be automatically collected in a spreadsheet, making it easy for you to see who is coming and what they need.
Plus, you can customize the layout of your documents and add your branding to perfectly match your event's aesthetic.
Organizing an event? Learn how to organize RSVP's using Google Forms
Using Google Forms surveys in the form of a quiz
One of the most popular use cases for Google Forms is creating quizzes. Quizzes can be used for a variety of purposes like assessing student knowledge or preparing for an upcoming test.
If you know how to deploy different types of questions then you know how to make a google questionnaire or quiz.
By clicking on the “Make it a quiz” option, you can even add an answer key to the form. This makes it easier to grade multiple choice questions. For short response questions, you can add a few different answers that would be accepted.
Once you've created your quiz, you can analyze the results. With Google Forms, you can see how many people got each question right and wrong, as well as what the average score was. Using the Google Sheet where your responses are stored by default, you can use filters to segment your data and see how different groups fared on the quiz.
With Form Publisher, you can automatically generate a PDF or Google Doc of the quiz results, which makes it easy to share with your students or colleagues.
Learn how to add QR codes to your Google Forms
Generate documents from your Google Form responses easily with Form Publisher!
Now that you know how to make a Google Form and all the different ways it can be used, you're ready to get started. Forms are an easy way to gather data from your customers or survey participants. While making a Google Form will simplify many of your professional and personal tasks,, why stop there? You can make your life even easier. With Form Publisher, you can easily generate documents for your records.
Form Publisher is an add-on for Google Sheets that makes it easy to create polished and professional-looking documents from your form submissions. With just a few clicks, you can have all of your data transformed into a beautiful PDF, Google Doc, or Microsoft Office document.
Most of all, though, Form Publisher allows your company to go paperless! It automates administrative processes so you can save time on time-off requests, agreements, consent forms, and much more. For more on use cases, visit our website.
So why wait? Install Form Publisher today and start taking advantage of its powerful features!